
Camera Controls and Default View
Decide how people can move the camera in your project, and where it starts.
Overview
Camera controls decide what people viewing your project can do with the camera. You pick the camera mode, turn rotate, pan and zoom on or off, and limit the angles the camera can reach. You can also save a Default view, the spot the camera starts from when the project opens.
Only the project owner sees these settings. They apply to everyone who opens the project, including you and anyone with a share link. To learn the controls themselves, see Camera navigation and Look around mode.
Open camera controls
- Sign in and open your project in the web viewer.
- In the left panel, open the Project Info tab.
- Click Camera controls to expand the section. The i button next to the title opens a short summary of every setting.
- Change the settings, then click Save.
The button shows Saved when the save succeeds, or Save failed, retry when it doesn't. The viewer applies the new settings at once, without reloading.
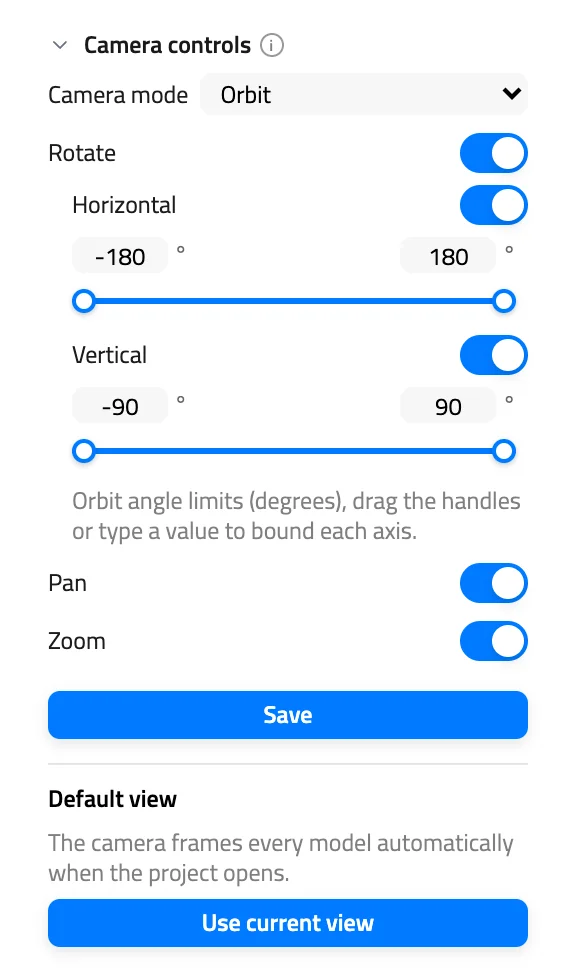
Camera mode
| Mode | Use it for |
|---|---|
| Orbit | The camera circles the model. Use it for objects. |
| Look around | The camera turns in place and people walk with the keyboard. Use it for scanned rooms and spaces. |
New projects use Orbit. When you switch modes, the camera stays where it is standing.
Rotate and angle limits
Rotate controls whether people can turn the camera with a left-drag or a one-finger drag. Turn it off to lock the viewing angle. In Look around mode, Rotate off means people can't turn their head.
With Rotate on, two more switches appear, each with a slider. Drag the two handles, or type a value, to set the range.
| Switch | Range | What the angles mean |
|---|---|---|
| Horizontal | -180° to 180° | 0° is the front of the model |
| Vertical | -90° to 90° | 0° is eye level. 90° looks down from above. |
The full range leaves that direction free. Narrow the Horizontal range when the back of a model is unfinished. Narrow the Vertical range to keep people from looking under it.
Pan and zoom
| Setting | Controls | When it is off |
|---|---|---|
| Pan | Right-drag, and a two-finger drag on touch screens | In Orbit the model stays centered. In Look around, right-drag no longer slides the camera. |
| Zoom | The mouse wheel, a middle-button drag, and a pinch | People can't move closer to the model or further away |
Default view
Without a default view, the viewer frames every model automatically and places the camera outside them. That suits an object. In a scanned room it starts people behind a wall.
To choose where the camera starts:
- Move the camera to the spot you want people to start from.
- In Camera controls, under Default view, click Use current view.
The viewer saves the view as soon as you click. You don't need the Save button for it. The section then reads "The project opens at the saved view." Click Use current view again to replace it.
Click Clear to remove the default view. The section then reads "The camera frames every model automatically when the project opens."
Reset view also takes the camera back to the default view.
Plans and embeds
| Setting | Minimum plan |
|---|---|
| Camera mode, Rotate, angle limits, Pan, Zoom | Corporate |
| Default view | Any plan |
On a lower plan you still see the camera controls, with the note "Customizing the viewer requires a Corporate plan". Clicking Save opens the upgrade window. See Plans.
Embedded viewers apply Rotate, Pan, Zoom and the angle limits. They ignore the camera mode and the default view. An embed always opens in Orbit and frames every model automatically.
Good to know
Turning off Horizontal locks the camera to the front view. Turning off Vertical locks it to eye level. Neither switch locks the camera where it is now.
Next Steps
- Learn the controls your visitors get in Camera navigation and Look around mode.
- Set the scene around your models in Environment and background.
- Compare what each plan includes on the Plans page.
Still have questions?
If you still have questions, please reach out to our support team for assistance.
Contact Support