
Environment and Background
Put your models in a 3D environment, a plain color or your own 360° image.
Overview
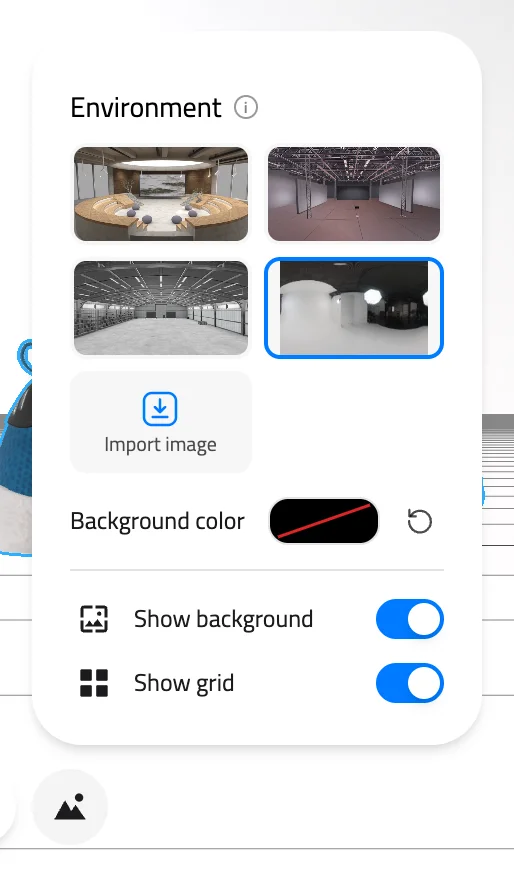
Click the Environment button at the bottom left of the viewer, next to Settings. The popup lets the project owner set what surrounds the models. There are three kinds of background:
- a 3D environment drawn around the models,
- a plain background color,
- a 360° image you import.
A project has one background at a time. Picking a new one replaces the old one.
The viewer saves the background with the project. Everyone who opens the project sees the same background, on the web and in the 3DtoMe apps.
Model: MaterialsVariantsShoe by Shopify, CC BY 4.0
3D environments
The top of the popup is a grid of thumbnails. Each one is a 3D environment from 3DtoMe, such as Industrial gallery, Circular lobby or Warehouse. Hover over a thumbnail to see its name.
Click a thumbnail to put your models in that environment. A blue border marks the one in use.
Background color
Click the swatch next to Background color to open your browser's color picker. The background changes color as you drag. The viewer saves the color when you let go.
Import a 360° image
Click the Import image tile at the end of the grid and pick a 360° image in equirectangular format. That is the flat, wide image that 360° cameras export.
| Requirement | Limit |
|---|---|
| File format | JPG, HDR or EXR |
| File size | Under 100 MB |
| Image size | 5120 x 5120 pixels or smaller |
The tile shows the upload progress as a percentage. When the upload finishes, the image becomes the background and gets its own tile in the grid. The file also appears in the Assets panel.
Imported images stay in the grid when you pick another background. Switching between two of them takes one click each way, with no new upload.
If the file breaks a limit, the popup shows one of these messages: "Use a JPG, HDR or EXR file.", "The image must be under 100 MB." or "The image must be 5120 x 5120 or smaller."
Remove or reset
Reset background is the button next to the color swatch. It clears whatever background is set, whether environment, color or image. Imported images stay in the grid, so you can pick them again later. The button is grayed out when no background is set.
To delete an imported image for good, hover over its tile and click the × in the corner. Confirm with Remove in the Remove imported image dialog. 3DtoMe deletes the file, and you can't recover it. If it was the current background, the project then has no background.
Show background and grid
Everyone sees two switches at the bottom of the popup:
- Show background shows or hides the project's background.
- Show grid shows or hides the floor grid. It is on when the project opens.
These switches change only your own view. The viewer doesn't save them. Show background is grayed out when the project has no background. Visitors then see the message "This project has no background set."
The owner sees the background when the project opens. Visitors see it only if the share link turns it on. To do that, open the Share window and turn on Show background under Options. Read more in Share with a link.
Who can change it
Only the project owner can change the background. It needs a Corporate plan. Visitors get the two switches and nothing else.
On a lower plan, the Environment button shows a padlock badge. The owner can still open the popup and see the choices, with the note "Customizing the viewer requires a Corporate plan". Picking an environment or a color, or clicking Import image, opens the upgrade window. See Plans.
Next Steps
- Show dimensions and play animations in View settings.
- Choose how visitors move the camera in Camera controls and default view.
- Compare what each plan includes on the Plans page.
Still have questions?
If you still have questions, please reach out to our support team for assistance.
Contact Support